Monday, July 27, 2026

Monday, July 27, 2026
* All product/brand names, logos, and trademarks are property of their respective owners.
Rubber flooring is widely used across UK warehouses, factories, workshops, and commercial premises due to its durability, slip resistance, and ability to withstand demanding environments. However, even high-quality rubber flooring can underperform if the wrong adhesive is used or if installation tools are overlooked.
Industrial flooring projects differ significantly from small domestic installs. Subfloors may contain residual moisture, surface conditions can vary, and heavy traffic from pallet trucks or machinery adds ongoing stress. Adhesive selection, surface preparation, and correct application techniques all contribute to whether a rubber floor performs reliably for years — or begins to fail prematurely. This guide explores the essential adhesives and tools used in industrial rubber flooring installations. The focus is on practical considerations, correct application methods, and avoiding common mistakes that reduce flooring lifespan.
Industrial rubber flooring is exposed to far greater mechanical strain than residential surfaces. Bonding must account for movement, temperature variation, and regular cleaning routines.
In UK commercial buildings, installers often encounter:
Concrete subfloors with minor moisture retention
Temperature fluctuations in large warehouse spaces
Continuous foot traffic and wheeled equipment
Cleaning regimes involving water or mild chemicals
The durability of rubber flooring relies on uniform adhesive performance, especially around edges and strip transitions. A careful selection of Adhesives & Accessories provides the support and materials necessary to manage these critical bonding areas effectively.
Three primary factors determine long-term performance:
Surface condition – Clean, dry, and lightly keyed surfaces improve contact between adhesive and subfloor.
Even distribution – Adhesive thickness must be consistent to prevent weak spots.
Edge protection – Joints and perimeters require careful sealing to reduce moisture ingress.
Understanding these variables before installation begins significantly reduces the likelihood of flooring movement or premature wear.
Choosing the right bonding solution depends on the application area and environmental exposure.
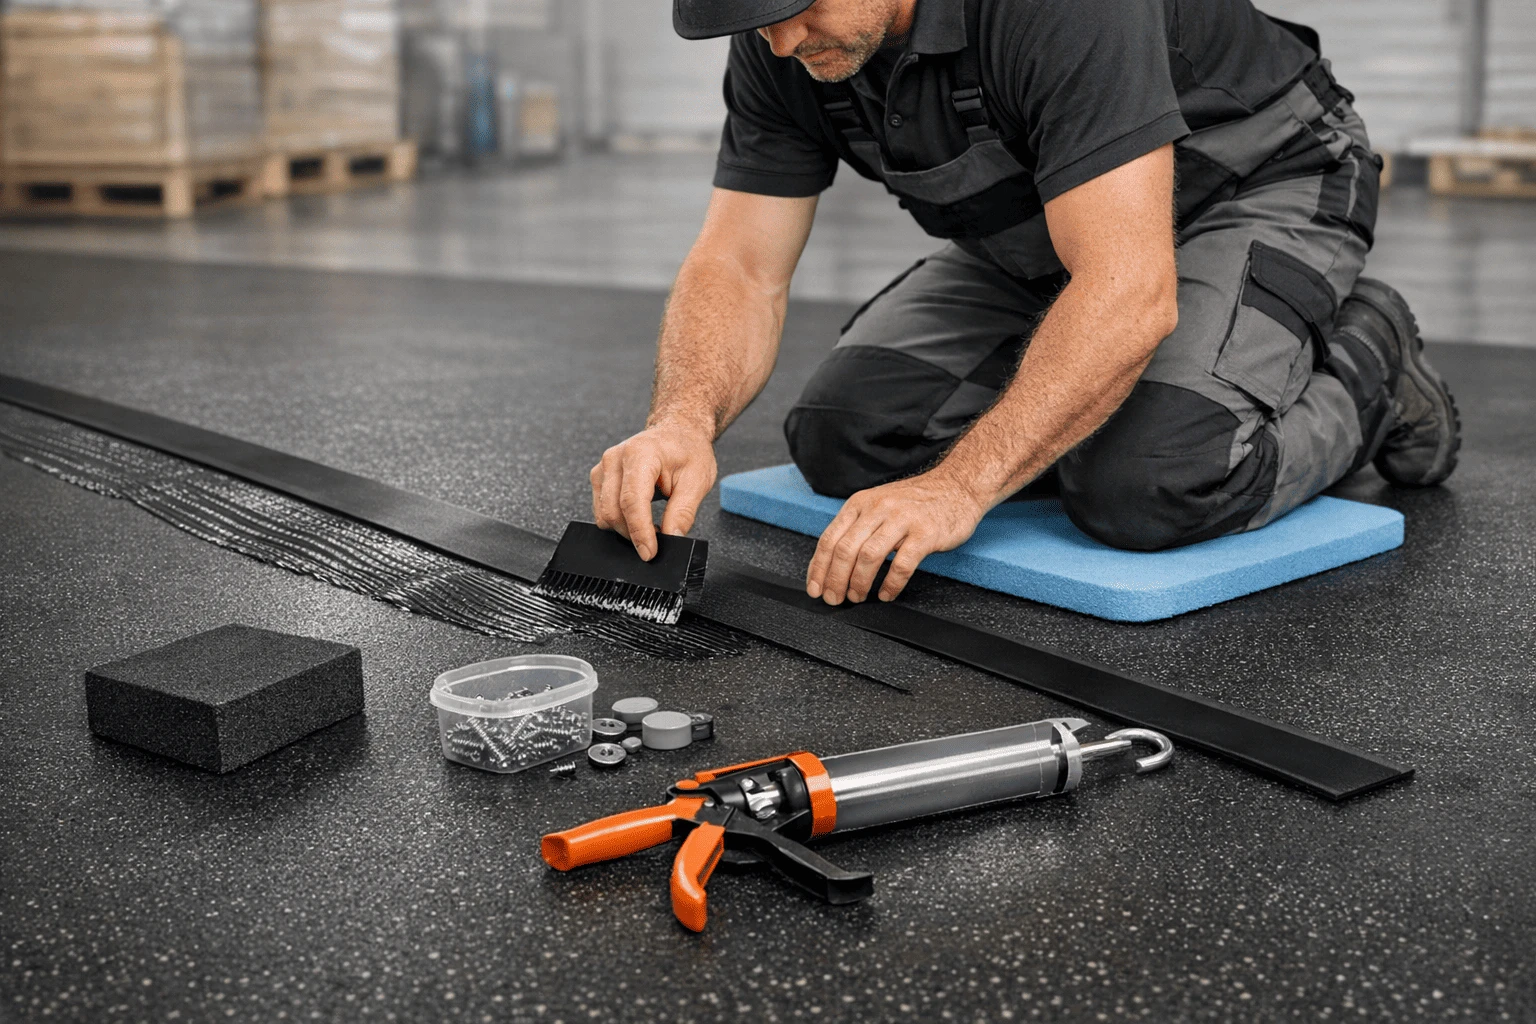
For detailed work and precise bonding, a contact adhesive is recommended. It allows controlled application, especially along vertical edges or narrow strip sections, supporting accurate placement without excessive spread. Precision in these areas improves the overall quality and durability of the installation.
A flexible, waterproof sealant is essential for perimeter sealing and joint reinforcement. It accommodates minor expansion and contraction, helping maintain bond integrity without cracking, particularly around thresholds and transition areas.
Using a structured method to secure rubber strips helps prevent early wear and lifting at joins. Proper alignment and secure fixing reduce the risk of movement and maintain the longevity of the flooring
The quality of adhesive matters, but so does the way it is applied. Inconsistent distribution or rushed sealing can undermine even the best products.
An even adhesive application is crucial for consistent bonding. Using an appropriate spreader ensures uniform coverage, reduces weak spots, and strengthens the overall installation.”
When applying sealants or adhesive beads along edges, precision tools improve finish quality. The Silver & Orange Skeleton Caulking Gun allows for steady pressure and controlled flow, particularly when working with waterproof sealants. Clean, accurate edge sealing is important in preventing moisture from working beneath the flooring — one of the most common causes of premature bond failure in industrial settings.
Surface preparation remains one of the most underestimated stages in rubber flooring installation.
Before applying adhesive, lightly abrading smooth surfaces improves mechanical grip. The Black Preparation Fine-Grit Sponge Block helps remove minor surface contamination and key the substrate without causing damage. Even minimal dust or residue can compromise adhesion. Spending time on preparation significantly improves bonding reliability and reduces the risk of edge lifting. In large commercial projects, consistent preparation across the entire area ensures uniform performance rather than isolated strong and weak zones.
Floor-level work across expansive areas can be physically demanding. Installer fatigue often affects consistency, particularly during lengthy adhesive spreading or sealing stages.
The Durable Foam Lightweight Light Blue Kneel Pad supports comfort during prolonged installations. By reducing strain on knees, installers can maintain steadier hand control and better focus. Comfort may seem secondary to materials and tools, but precision often declines when fatigue sets in. In industrial environments where square meterage is substantial, sustained comfort contributes to a higher-quality finish.
A structured approach ensures reliability and repeatability across projects.
Step 1: Prepare the surface
Clean thoroughly and lightly abrade smooth areas using a fine-grit preparation block.
Step 2: Dry-position materials
Align rubber strips and confirm placement before applying adhesive.
Step 3: Apply adhesive evenly
Use a spreader for consistent coverage and contact adhesive for targeted bonding areas.
Step 4: Seal edges and joints
Apply waterproof sealant with controlled pressure to reinforce perimeters.
Step 5: Allow proper curing time
Avoid early traffic until the adhesive has fully set.
Following this sequence reduces errors and ensures bonding strength develops correctly.
Even experienced professionals can encounter avoidable issues:
Skipping preparation often leads to bond failure.
Over-application of adhesive can slow curing and weaken the structure.
Under-sealing edges increases moisture penetration risk.
Rushing curing times compromises bond strength.
Ignoring installer fatigue affects consistency and finish quality.
Recognising these pitfalls early supports better long-term outcomes.
Effective rubber flooring installation relies on a complete system approach — from surface preparation to sealing and curing. For those seeking further technical reference and practical resources, commercialstrips.co.uk provides supplementary guidance in a neutral, informational format.

Experienced in content marketing, SEO, and guest posting. I focus on creating and publishing articles that drive traffic, build authority, and generate real results for UK brands.
If you are buying a ball valve for the first time, it is easy to assume that all ball valves are mor
10 June 2026
Investing in a new Press Brake is one of the most important decisions for any metal fabrication busi
3 June 2026
Modern industries are rapidly adopting advanced manufacturing technologies to improve precision, eff
19 May 2026
Be the first to share your thoughts
No comments yet. Be the first to comment!
Share your thoughts and join the discussion below.


11.webp&w=3840&q=75)